Links
Tags
Building a Synchronised Christmas Lights to Music Display - Part 7
With Christmas now over, the lights have come down and apart from what's left on the roof - it's packed down fairly easily. The show itself ran until the 28th December 2021. I originally planned for it to run right to the end of the year but with no viewers after Christmas Day, it was time to turn it off.
Suffice to say, the actual show was pretty uneventful (in a good way!). No police called, no neighbour complaints, just a lot of happy people coming by in groups - 1-2 an hour. I didn't advertise the display but it was organically found within the first hour of the first show and posted on the local Facebook groups. No further posts up until the last few days leading up to Christmas itself. Suffice to say if I had posted there, there'd certainly have been a lot of visitors which no doubt would have started to upset those in the street and attract the attention of those wanting to impose restrictions on lights. There are plenty of stories in the community this year about councils cracking down on large gatherings requiring some displays to register as 'events' and have traffic management plans in place so I'm glad I didn't have to face that this year.
None-the-less, with a successful light display for 2021, I thought I'd catch up on the few things that occurred during the show of notable interest.
Helping the viewers know what it was they were looking at
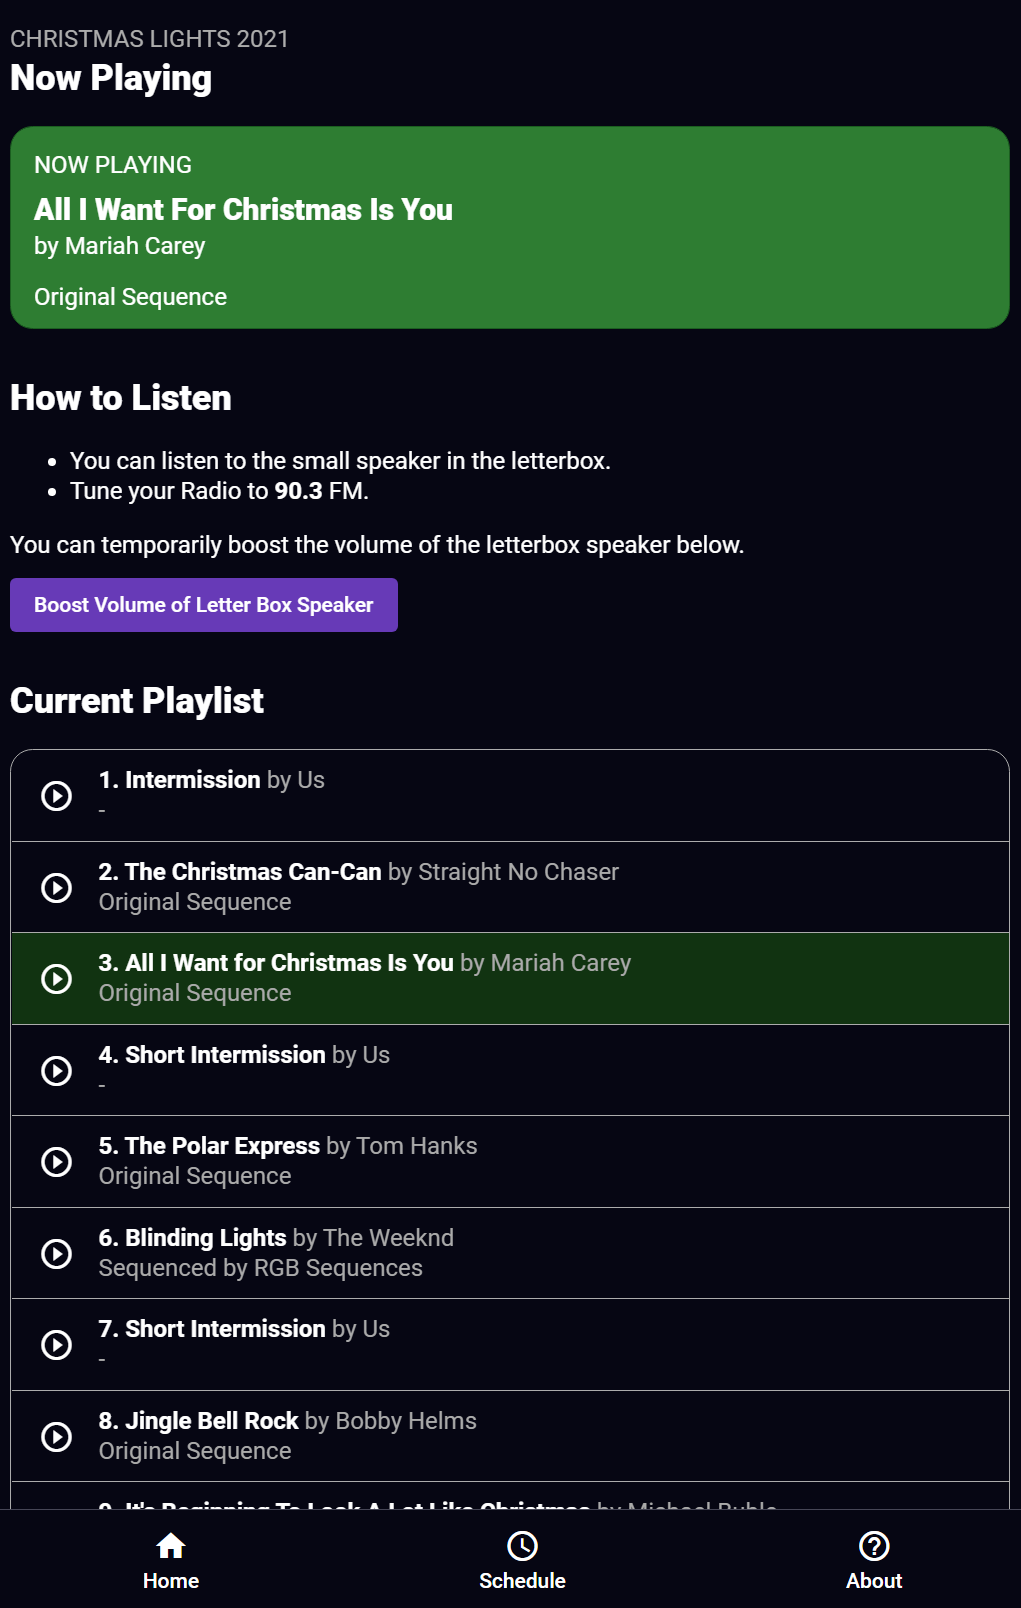
As it turns out, not many people knew the display was synchronised to music. Furthermore, after around a minute in the first week - people would drive off - presumably not seeing anything that would indicate that there is music here, even though each sequence would display the FM frequency to tune into and intermissions for the same. I thought the singing trees themselves may have been enough of a hook to understand that something more is going on - but alas, no. So after a night of coffee and code, I'd put together a poster and a web app that would enable viewers to see the schedule, see what's playing, control the display by selecting something to play and allow them to boost a small speaker I'd place in the letterbox for the rest of the run.
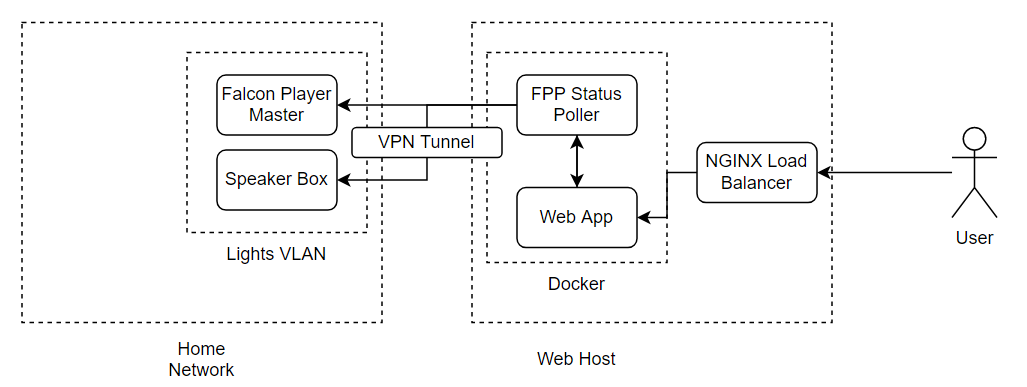
The concept was simple. Falcon Player has a full REST API available, as well as the ability to intercept UDP messages for the Multisync protocol - which tells the other "slave" players what's playing and what timestamp it's up to. I would build a basic poller with cache that would talk to both the Speaker Pi and the main Falcon Player Controller - but also listen to the Multisync broadcasts for immediate changes in status, and time position (otherwise, you've got to start writing 1-2 second pollers). To do this, I'd set up a VPN between my home router (a Ubiquiti Dream Machine Pro) and the web server. This created some sort of proxy that meant any damage to the show via the web page would not impact my home network.
The Web App on request would ask the poller for it's status, playlist and allow requests for a temporary volume increase to make it's way through to the Speaker Pi specifically. The frontend is a simple Angular SPA - nothing fancy going on here. Just a Flex Layout with a tabbed style interface and some material design popups. A poster would be visible on the letterbox with a large QR code to access the webpage. For future years, I'd like to incorporate some sort of code to flash up that you key in to confirm you're actually standing in front of the house to avoid abuse, but for this year it was sufficient to just have a kill switch if need be to turn off requests or speaker boosts. I'm also in favour of not putting hurdles in front of people, unless I need to due to exploitation of whatever is displayed.
The speaker setup used a Romoss 30,000mAh battery, a Raspberry Pi 2, a TP-Link AC750 router in Client Bridge mode and an old but fairly good quality portable speaker. I had also 3D Printed a button to stick on the letter box, but very few used it so it was removed after a week - it really needed to be incorporated into a prop or something else interactive I think - and perhaps with Covid-19 fresh in everyone's mind, perhaps people didn't want to press the button just in case. The first time I had set it up, for a few days the player would randomly freeze. I thought it might have been low power or the fact this Pi is probably 6+ years old. I also tried a Pi Zero - but having to add USB soundcards made that impractical and they'd just stop responding to Multisync packets. It turns out that after a bit of investigation of the system logs, that the SD card might be faulty. Swapping the SD card seemed to fix the issue, not sure if the SD card itself was faulty or what...
The sound quality itself was fine, but you could tell that there was a fair bit of "catch up" when using wireless to get the best 'sync' possible. I don't have a particularly strong wireless access point near the front of house meaning the wireless strength was pretty poor itself no doubt contributing to the problem. It also highlighted why you probably don't want to run your show from wireless only as you might find your lights slightly delayed and 'choppy' too.
With Covid-19 restrictions requiring QR code scanning, people are so used to scanning QR codes of any kind with their phones. With a large enough one on a poster, people will get out of their cars to scan it. This improved the viewer rate, and the kids that you could hear in the car certainly seemed to enjoy it more when the Bluey remixes and Polar Express were available. Overall, a win for having an app that viewers can select and play what they want to hear on the display.
Fast repairs - and boy you're going to want to practice this.
At the end of the day, the display is all DIY. From time to time you'll mess up a solder joint, or maybe you'll not put enough silicone in to make the string of LEDs waterproof. The first failure I had was all down to a bad solder joint from possibly the very first LED strip I put together. The symptoms were that it'd stop working - especially after a bit of light rain. A bit of a wiggle would bring it back to life - but of course it had to be one of the ones that were on the roof.
Other failures included:
- One particular snowflake that had multiple bulb failures - this is where you will come well acquainted with scotch locks and other joiners. You'll probably also want to buy extra strip or strings to combat any failures you might have during the show.
- In the small matrix, one of the bulbs lost colour intermittently - this wasn't worth the hassle of cutting it out as the Data line was being passed through fine.
- In the larger matrix, one pixel had caused significant flashing - I didn't have a spare for this kind of string so it remained flashing during the show.
- The FM transmitter I bought could barely make a couple of meters so I needed a replacement that would at least get a 20m range. I'm sure the original one could have been modified to go further but alas - fighting with it in the first week wasn't pleasant.
What people really like in a display.
When some general public viewers would rock up while I was outside viewing / recording / anything really, most would start with some shock with what they were seeing (i.e. all new), eventually realise it was synchronised to music and then they would proceed to talk about others in the area. The noticeboards and other local groups on Facebook also indicated the same. It would appear that the more lights there are, the better - but they also like props and given the sheer number of them this year (including the next door neighbours inflatables display), it's clear that despite it being unique that you do tend to come across those who think you can buy the stuff straight out of Bunnings.
What I take away from this is that the general public love lights and displays. They don't think too much about it (the occasional one does), and they will move on to the next and comment later about how awesome entire streets are when everyone's working together. And that's really it. If you're in a street with lots of lights, your street becomes the talk of the town - and you get your driveways clogged with cars just as another local street does on a routine basis.
To that end, whatever you make - be it singing, plain, inflatables, people will generally like it if the lights light up. The downside to a fully flashing display is that I felt that I needed to turn it off after 10PM - at least switch it to a non-blinking display. It'd would be too distracting if it was blasting in your window or down the street.
What to do for 2022's display?
I get asked this one a lot. I'm still not sure what I plan on doing, but I'm sure it'll involve more focus around props. People really love the props that move and so I might even look into waterproofing up some stepper motors and giving that all a go. Not sure how that will pan out, but hey - check back here in September and I might have more of an idea.
If you're thinking about doing a display yourself though for the first time, I'd recommend you grab yourself some pen and paper and start drawing out a layout. Pixels will go on sale in the next month or two and paying for shipping by boat will be far cheaper than any airfares you might have to pay otherwise. I'll probably be ordering several thousand pixels soon(tm) even if I don't fully know what I'm going to do with them ... yet.
In the meantime, this will be the last post on the Christmas Lights display for 2021 but there are more 3D printing projects coming up. So much for this being a coding blog hey.
Merry Christmas - 2021 (aka Part 6)
Merry Christmas All! Our Christmas Lights Show for 2021 video is below.